- Blog
- EMO Mails Individual - DPMS Process
EMO Mails Individual - DPMS Process

We had EMO package for printing, redirection or return of EMOs. In CSI, we can perform all these activities in the same window.
In this article I will be explaining how to print EMO, invoice, return and redirection.
This is a sub article of DPMS
View/Update Money Order.
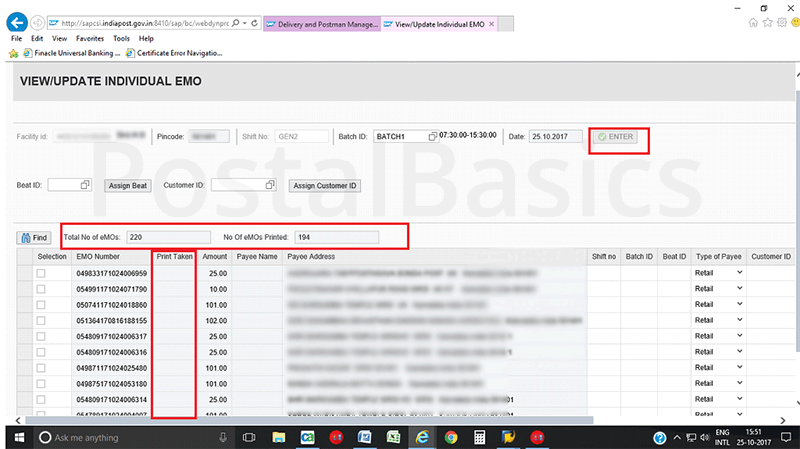
This option is for printing the EMOs which are received at your office. Click on the link “view /update individual emo”. Below window will appear.

Click on Enter button. The list of all EMOs will be displayed. Select some of the EMOs at once and click on the print button. A pdf will be opened, of which you can take a print. Do not close the pdf unless all the selected EMOs get printed.
If you do not get the print due to network problem or printer problem then, it is difficult to find the unprinted EMOs in the list because, once you open the pdf file, the print taken option will be updated to YES. Be cautious while printing.
EMO Invoice to PostMan
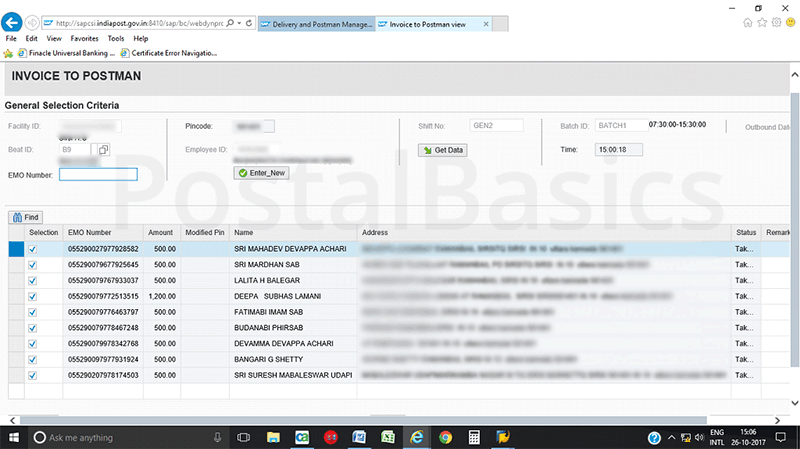
The procedure is same as invoicing articles to the postman.

Select the beat ID, invoice the EMOs to respective beat. Select all and click on save button. Once you have saved the items, they will not be changed or deleted.
Cross check the EMOs and amount before saving the data. Once you saved the data, a pop up will appear showing that, total amount and no of EMOs invoiced to that beat.
EMO PostMan Return
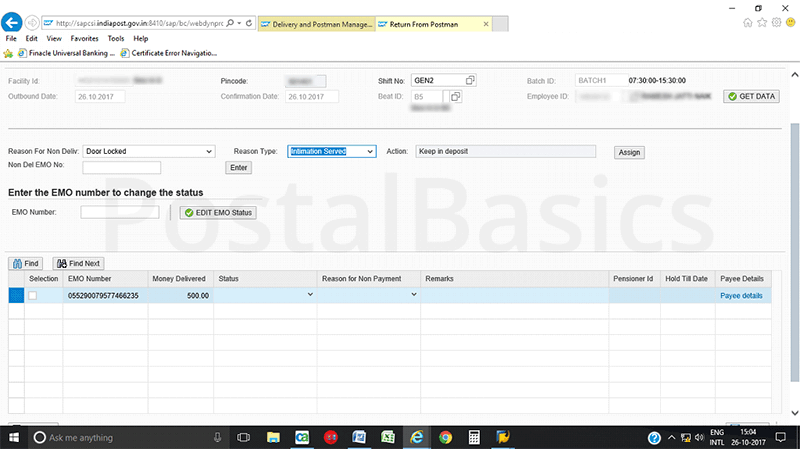
Click on the link Return from Postman. The below screen will be displayed.

Select the beat ID and click on GET DATA. The invoiced list will appear.
If any EMOs are not delivered, then select Reason for nondelivery, Reason type and scan the respective EMOs. Once you have taken the returns of all EMOs, click on save button.
A window will pop up showing delivered EMOs, undelivered EMOs, delivered amount and return amount. Press OK button.
EMO Redirection
This process is same as the redirection of articles. Any EMO which is not deliverable at your office, you can redirect it to the concerned office. Click on EMO redirection link and the below screen will open up.

Scan the EMO, select the reason for redirection, enter the pin-code and the address. Once you enter the details, click on ENTER button. Select the entries and click on SAVE button.